Little House Playmat Sew Along - Week Two
WEEK TWO – PERPARATION OF APPLIQUE DECORATION OF FRONT AND INSIDE DOOR PANELS
 You will need:

- Fusible web “Bondaweb” or “WonderUnder” – approximately 1 metre.
- Medium iron-on interfacing – approximately 1 metre.
- Scraps of fabric for door, curtains, boxes in the roof and other decorative appliqués in a variety of colours. The largest size piece will be for the appliqué door which is 17cm x 25cm.
- 3 x grey fabric pieces 20cm x 16cm
- 12mm bias binding in white for the sash windows – approximately 5 metres
- 25mm bias binding white for the sash windows – approximately 6 metres
- 12mm bias binding for the door appliqué in a colour of your choice – approximately 2 metres
- 12mm bias binding in brown for the beams in roof – approximately 1 metre
- 25mm bias binding in brown for the inside door – approximately 1 metre
- 25mm bias binding in beige for the boxes in the roof – approximately 2 metres
- (You will also need the fabric scraps that you saved from cutting your house panel pieces last week)
- And a removable (either wash or fade away) fabric marker would also be very useful if you have one.
This week we begin the appliqué decoration of your playmat – eventually you will be appliquéing onto
both the inside and outside door panels separately and the roof part of the
house panel.
Inside Window Pocket
Appliques
You will need your two edges of sky print that you cut from
your house panel in week one.
Cut both of these sky pieces into thirds as shown in Picture
one below, making 6 sky pieces in total. (Each piece should have a long length of
approx 20cm)
 |
| Picture One |
Now take one of these 20cm pieces and cut the 20cm length
into two pieces of 10cm. Then trim the
width of these pieces to 8cm – making two pieces of 10cm x 8cm. As you are trimming to 8cm wide try and avoid
any bits of print with chimneys or selvedge in your cut pieces and remember your birds should be
flying the right way up! (Four of these 8cm x 10cm pieces are shown in Picture
two).
 |
| Picture Two |
Keep cutting until you have 12 sky pieces of 8cm x 10cm in
total. These will make your inside window pockets. You may want to lay these out in set of four as shown in
Picture two to get some idea of how your windows will look.
To begin making your
window pockets use 12mm white bias binding to join two pieces down the 10cm
length. As shown in picture three. Place
the two sky pieces next to each other on your cutting surface so that the 10cm
edges butt up against each other. The bias binding is then placed ontop to cover
the raw edges and top stitched on to join the two pieces of sky fabric. When
top stitching, stitch approximately 2mm from the folded edge of the bias,
firstly on one edge of the bias and then on the other. (Also see Diagram One below) You will now have the two sky pieces joined by
a bias strip as shown in Picture three. Repeat this process with all of your sky
pieces making six joined sky pieces.

 |
| Picture Three |
Of your six joined sky pieces three will form tops of your
window pockets and three will form the bottoms of your window pockets.
Top of the window
pockets
Take one of your joined sky pieces and using 25mm white bias
bind the top and bottom edge of this joined sky piece. This time you will be
folding the bias over the raw edges and stitching on it on working again
approximately 2mm from the edge – this time only stitch the edge of the bias closest
to the centre of the window piece - see picture four below.
 |
| Picture Four |
Then trim the edges of the bias to be flush with the edges
of your fabric and bind the 8cm edges of
your sky fabric in the same way – this time remembering to fold over the raw
edge of your bias binding at each end to create a neat finish. Again only sew
the edge closest to the centre of your work - See Picture Five.
 | |
| Picture Five |
Repeat these processes to make a total of three top window
pocket pieces.
Bottom Window pockets
The process for the
bottom of the window pocket piece is very similar to the top window pocket
piece but has a lining.
Take one of the joined
sky pieces put aside for the bottom window pockets and use this as a guide to
cut three pieces of pocket lining from the fabric you saved when cutting out
the inside door panels in week one - See Picture Six.
 |
| Picture Six |
Lay the joined sky piece on top of the lining piece with the
wrong sides facing and bind the top edge with 25mm bias binding as you did for
the top window pocket pieces as before . See Pictures seven and eight.
 |
| Picture Seven |
 | |
| Picture Eight |
Now bind the bottom edge and the two side edges in exactly the
same manner as you did for the top of your window pockets. Repeat these
processes to create three “bottoms of window pockets". These will be sewn to the
inside of your door panels next week.
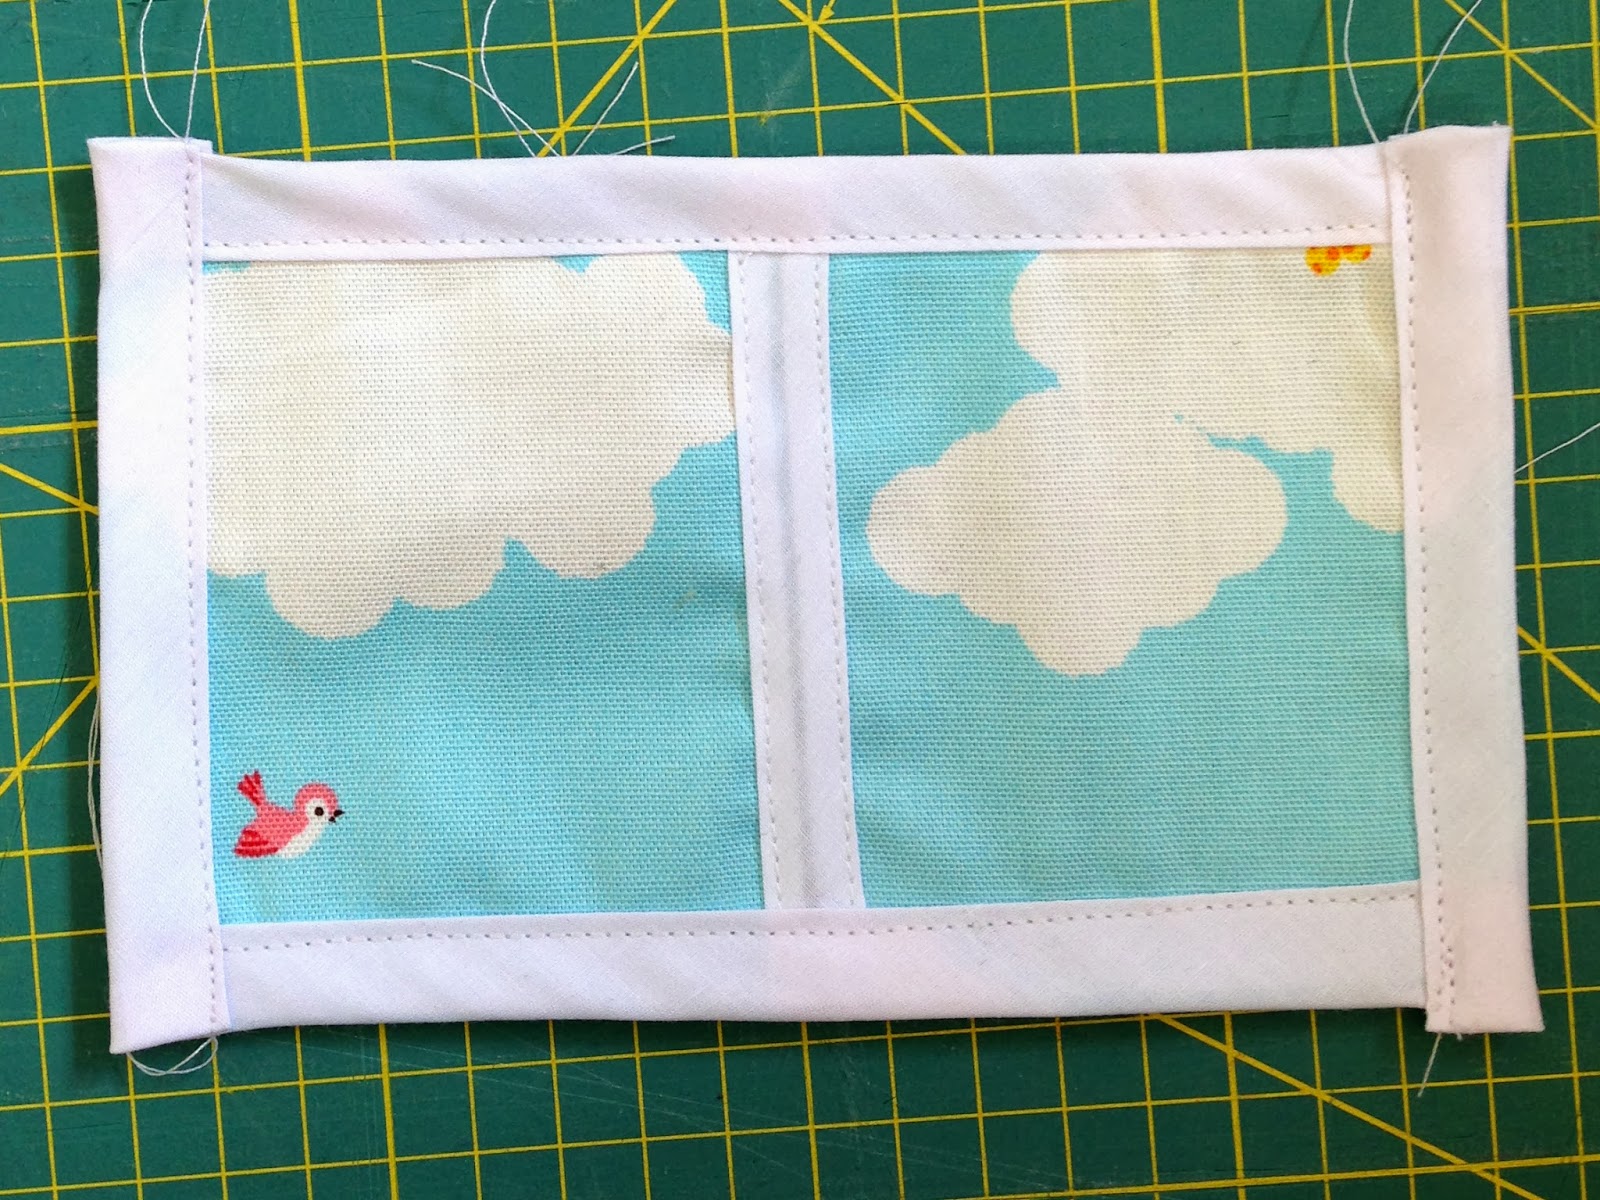
Outside window appliques
Cut 3 pieces of grey fabric 20cm x 16cm.
Choose fabric from your scraps to make your curtains. An
easy way to do this is to firstly cut another 20cm x 16cm piece from your
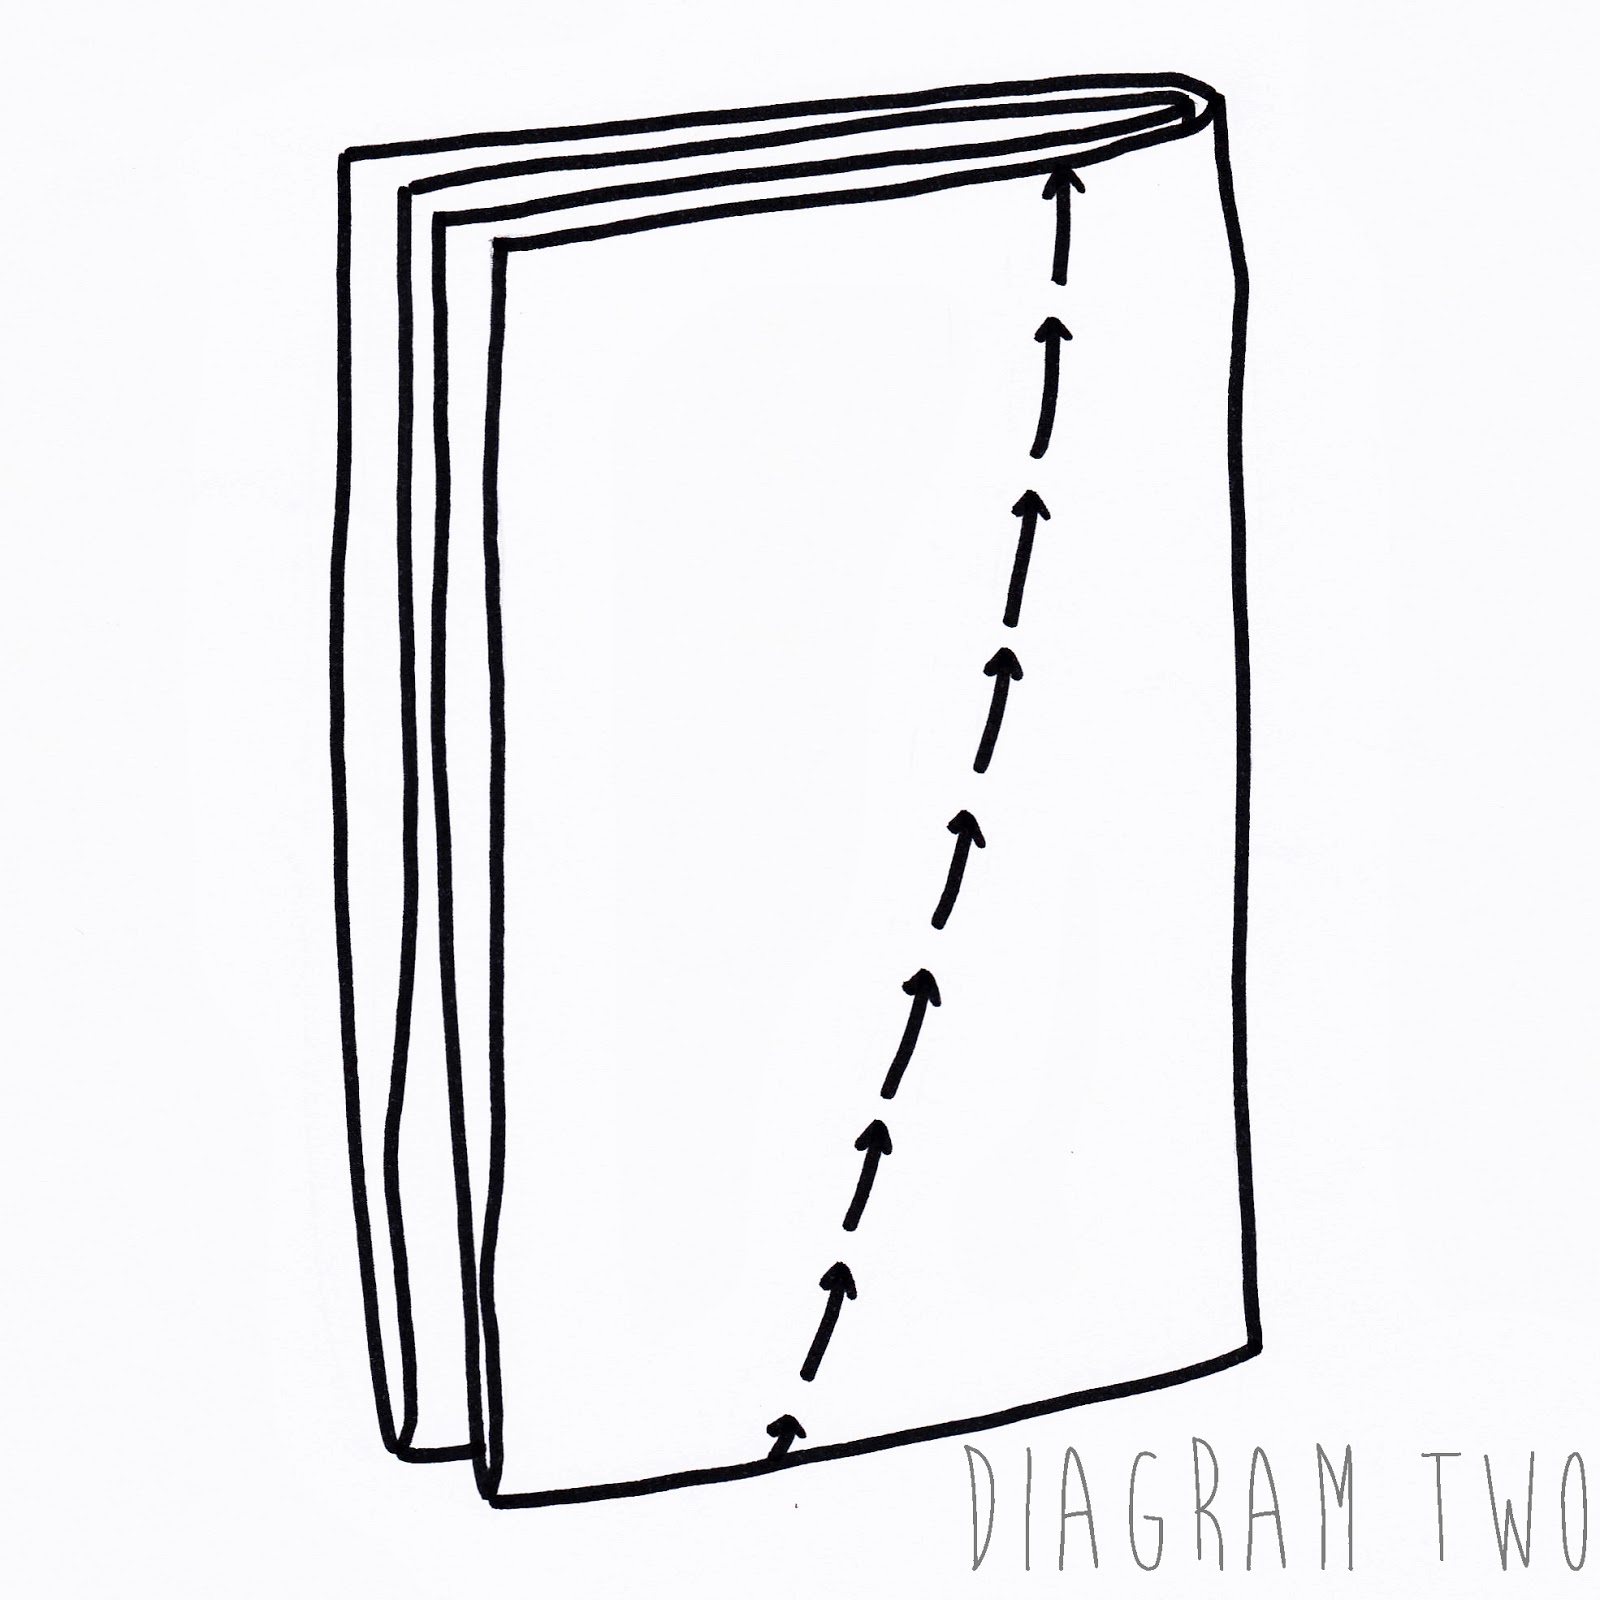
scraps and iron on bondaweb to the reverse side leaving the paper on for the
moment. Then fold this piece into four
and cut a curved line as shown in diagram two – this will give you two mirror
image curtain pieces.
Now remove the bondaweb’s paper backing from both curtain pieces and iron onto the
grey fabric as shown in picture nine, below.
Next sew on two pieces of 12mm white bias binding in a criss cross
fashion across the centre of your window to create a window pane effect. (Stitch
2mm from each edge of the bias binding when doing this.) Again see Picture
Nine. Repeat these process to create three
outside windows.
 |
| Picture Nine |
Now all your outside and inside window components are complete. Well done!
NEXT WEEK – We will be stitching some more appliqué decorations and attaching them to your inside and outside of your door panels. The materials list at the beginning of this entry still stand for week 3, keep hold of all the bits you have and haven't used and we'll see you next week for part three!
NEXT WEEK – We will be stitching some more appliqué decorations and attaching them to your inside and outside of your door panels. The materials list at the beginning of this entry still stand for week 3, keep hold of all the bits you have and haven't used and we'll see you next week for part three!
♥
Labels: childrens, diy, do it yourself, dolls house, make along, play mat, playmat, project, sew-along, Tutorial
posted by eternal maker @ Monday, October 14, 2013
![]()
![]()

0 Comments:
Post a Comment
Subscribe to Post Comments [Atom]
<< Home